Vanilla Cookie Banana Pudding

What You Need:

In one bowl:

1 3.4 oz box of French vanilla jello pudding mix

1 3.4 oz box of banana cream jello pudding mix

1 block of cream cheese

1 14oz can of sweetened condensed milk

4 cups of milk

1 tablespoon of vanilla extract

In second bowl:

1 1/2 cup of heavy whipping cream

3/4 cup of powdered sugar

1 tablespoon of vanilla extract

A dash of cinnamon

You also need vanilla wafers and biscoff cookies


Steps:

  1. Mix together all ingredients in bowl number 1 and in bowl number two. Cover each bowl and place in the refrigerator for 30 mins.
  2. After the 30 mins mix together the two mixtures.
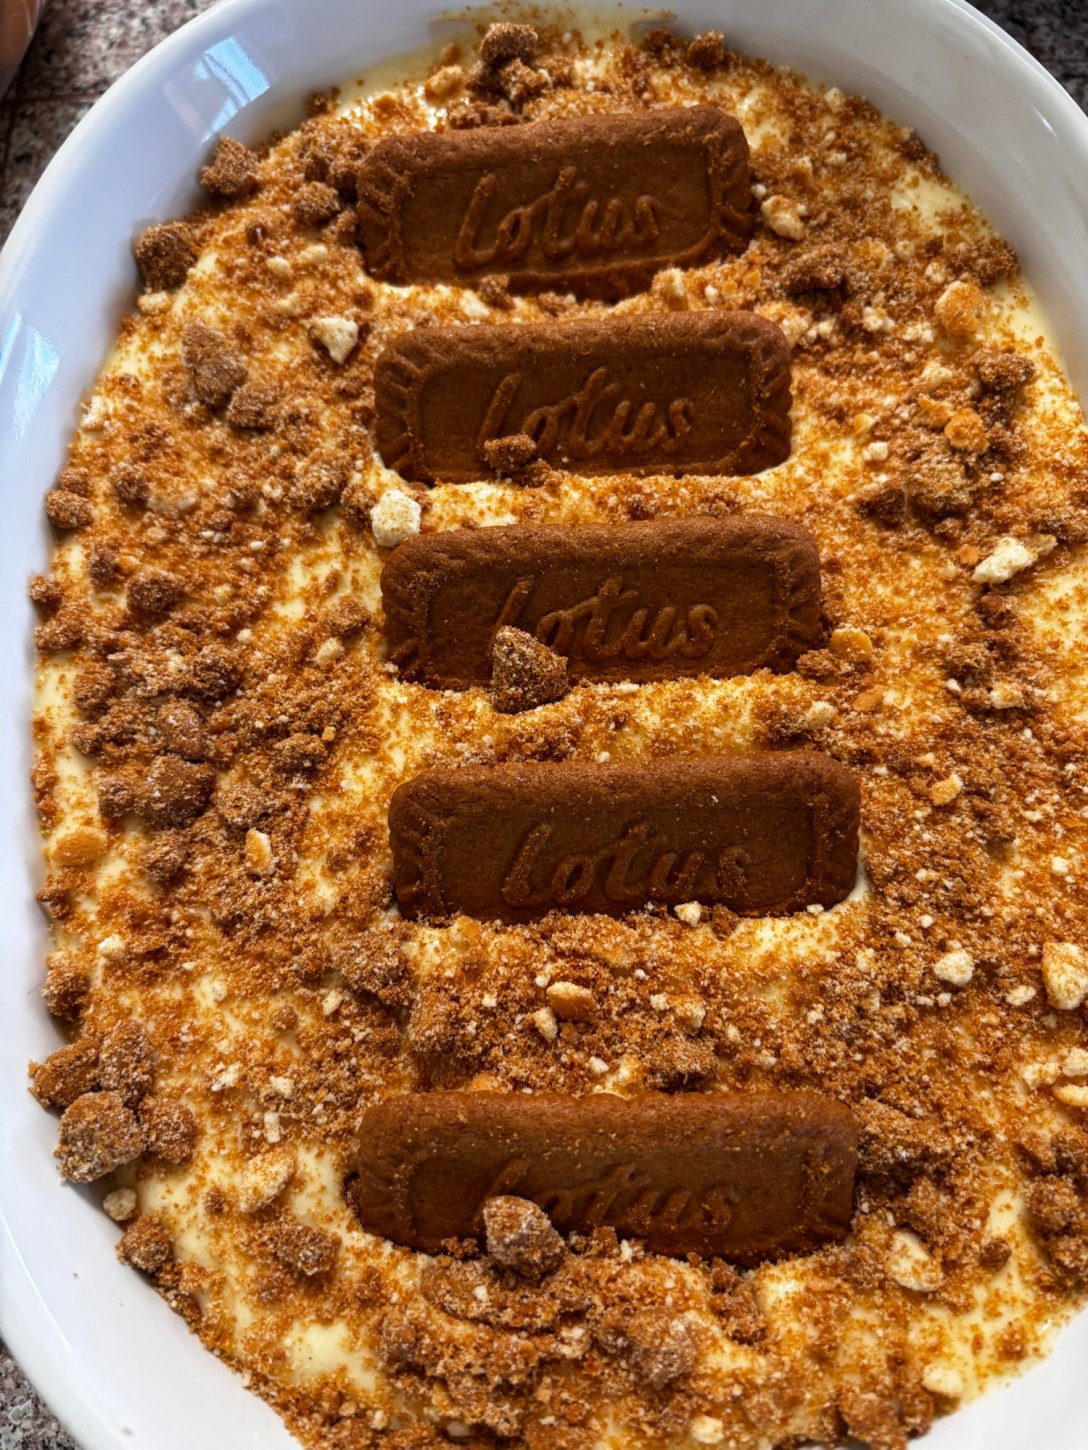
  3. Begin your layering. Thin layer of pudding mix, cookie, pudding, cookie, pudding.
  4. Top off the pudding with crushed vanilla wafers and biscoff cookies.

Enjoy!

*you can add fresh banana – optional*

Puff Pastry Twists With Nutella

I made these for my girls for breakfast and we indulged! They were so yummy! Especially with freshly chopped strawberries!

I hope you enjoy these as much as we did!

Servings: 6 pastry twists

What You Need:

1 17oz package of Pepperidge Puff Pastry

5 – 6 generous globs of Nutella (measure with your heart)

3 give or take tablespoons of softened unsalted butter

Egg wash (1 egg white and a dash of milk)

Steps :

1. Thaw out your frozen pastry (35-40 mins). Once thawed out preheat oven to 400.

2. Lay your first sheet of puff pastry on parchment paper on a cookie sheet. Spread the Nutella evenly.

3. Lay the second puff pastry directly on top of the puff pastry covered in Nutella. Slice in 6 strips and twist. The twisting doesn’t need to be perfect at all.

4. Bake at 400 for 13-15 minutes. Bake until golden. Once the pastries are done remove from oven and brush with softened butter and allow it to melt all over the twists. Cool for 5 mins.

5. Serve with freshly chopped strawberries and powdered sugar.

Enjoy!


This is the puff pastry. Amazing!
Slice in 6 strips.

Maple Cinnamon Apples Made In The Skillet

What You Need:

2-3 apples chopped (skin left on)

2 tablespoons of water

A few dashes of cinnamon

1-2 tablespoons of maple syrup

1 tablespoon of granola (optional)

Steps:

1. Chop your apples and place in skillet with the 2 tablespoons of water. Place lid and allow to simmer on a medium low for 5 mins.

2. Add the butter, cinnamon, and maple syrup to the skillet and place the lid on the skillet and allow to simmer for an additional 5 minutes or until soft. Throw in some granola while hot and toss around (optional)

Top with ice cream or whip cream! Enjoy!

Custard Filling For Pastries

Great custard recipe for filling pastries or donuts or eating as is with some fresh fruit!

What You Need:

4 egg yolks

1 2/3 cups of whole milk

2 teaspoons of vanilla extract

1/4 teaspoon of salt

1/4 cup of corn starch

2 tablespoons of unsalted butter

1/2 cup of sugar

Steps:

1. In medium mixing bowl whisk together the corn starch, salt, and sugar. Next add the egg yolks until well combined into a beautiful yellow color. Set aside.

2. In a small/medium pot add the milk and vanilla extract. Place on stove on a low/medium heat watching intently. When the sides begin to slightly bubble (not boiling) remove from the heat and slowly add to the batter. (Careful not to add quickly to the batter otherwise it could cook the egg yolks).

3. Transfer back to pot and heat on medium/low heat. Continuously whisk the batter in the pot until it begins to thicken into a custard consistency. (a few minutes).

4. Once thickened, remove from the heat and add the 2 tablespoons of butter immediately. Mix well. Cover with plastic wrap, and place in refrigerator until ready to serve.

Enjoy!

Custard With Puff Pastry

Servings: one puff pastry box will make 8 pastries.

Cut puff pastry into 8 squares folding in half (brushing egg wash on the inside and out) baking at 400 for 20 mins. Cut pastry open and insert custard and fresh strawberries. Top with powdered sugar! So yummy!

Sweet Crepes For Sweet Fillings

Servings: 12 to 15 crepes

What You Need:

A blender

1 cup of flour

2 eggs whisked

1 teaspoon of vanilla extract

2 1/2 tablespoons of white sugar

1/2 cup of water

3/4 cup of whole milk

3 tablespoons of melted unsalted butter plus extra for coating skillet

Steps:

1. Add the milk, eggs, water, vanilla extract, sugar, melted butter, and flour to the blender and blend for 10 seconds. (An extra pulse or 2 if there’s still a little flour stuck to the sides)

2. Set in refrigerator for 1 hour.

3. On a low medium heat, butter the pan and pour about 1/4 cup of batter onto the pan and swirl it to evenly coat the bottom. When the edges begin to curl flip it over and allow the other side to cook (about 10 seconds).

4. Fill with desires fillings, fold, and top with powdered sugar or whip cream.

Enjoy!

Spring Time Lemon Bars

Spring time calls for lemon bars! The perfect tart, sweet treat to enjoy in some beautiful weather! This is also a great recipe to make with your little ones! Especially when pressing the dough!

Let’s get started!

What You Need:

For The Crust:

8 tablespoons of unsalted butter softened

1/2 cup of white sugar

2 cups of flour

A pinch of salt

For The Filling:

6 eggs

3 cups of white sugar

2 grated lemons for lemon zest

1 cup of fresh lemon juice

1 cup of flour

Powdered sugar for dusting

Steps:

  1. Preheat the oven to 350.
  2. For the crust, mix together the butter and sugar with an electric mixer until combined. Then add the flour and salt. Mix well, don’t be afraid to get your hands dirty.
  3. Once all combined flatten the dough into a 9 by 13 glass baking dish.
  4. Bake the crust for 20 to 25 minutes, until lightly browned. While crust is baking prepare your filling.
  5. For the filling, mix together the eggs, sugar, lemon zest, lemon juice, and flour. Pour over hot crust and bake for 35 to 40 minutes, until the filling is set and not wobbly. Let cool to room temperature. Then chill in the fridge for an hour.
  6. Dust with powdered sugar and cut into squares. Enjoy!

Tip: place lemon bars in freezer for 30 mins and once removed will be easier to cut squares!

Arroz Con Leche – ‘Mexican Rice Pudding‘

What You Need:

7 cups of water

1 cup of white rice

1 teaspoon of cinnamon or 1 cinnamon stick

1 12oz can of evaporated milk

1 14oz can of sweetened condensed milk

1 cup of whole milk

1/2 tablespoon of vanilla extract

Steps:

1. In a medium/large simmering pot bring the water, rice, and 1/2 teaspoon of cinnamon to a boil or the cinnamon stick. Boil for 18 minutes, uncovered.

2. Drain the liquid from rice and add the milks and vanilla extract to the pot. Keep the stove on a medium heat and mix for 20 mins consistently until thick and creamy.

3. Pour the rice pudding into a round 2 1/2 qt dish. Mix in the rest of the cinnamon (1/2 teaspoon) and continue to mix while still hot.

4. Serve right away warm or chill for 2 to 4 hours. Dash some more cinnamon on top for appeal. Enjoy!

Cream Cheese Frosting

Cream Cheese Frosting

This amount of frosting is good for 24 cupcakes or a 9×13 size cake. There may be a little extra just to eat! Yum!

What You Need:

1 8oz pack of cream cheese (softened)

1/2 cup (1stick) of unsalted butter (softened)

2 teaspoons of vanilla extract

1 1/2 cups of powdered sugar

1/4 teaspoon of salt

A small squeeze of a lemon (optional)

Steps:

1. Combine all ingredients into a medium sized mixing bowl except for the lemon. Mix well until smooth and creamy.

2. Now take the lemon and squeeze just a little bit of lemon juice to give the frosting a sweet tangy taste. Mix well. Taste, and add more if needed.

3. Spread on cupcakes, muffins, breads, whatever your little heart desires.

Note: store any left over frosting in the fridge. Frosting is good for 3-5 days.

If it’s looking like this picture below the cream cheese or butter may not have been softened enough. No worries though! Just let the frosting sit out for a bit. Then mix again with an electric mixture.

A little lumpy, I knew the butter wasn’t soft enough!

I let it sit out and then we re-mixed it. Smooth and creamy, just what we wanted!

Enjoy my precious gems!

Peanut Butter Cookies With 5 Ingredients

Btw, these are flourless!

Warning: these 5 ingredient peanut butter cookies are highly addicting! And honestly, I don’t really feel guilty eating them!

Let us know what you think!

Servings 16-18 cookies (tip: use a tablespoon measuring spoon to scoop to make the perfect size)

What you need:

1 cup of natural peanut butter

1 cup of sugar

1 teaspoon of vanilla extract

1 large egg beaten

Salt for sprinkling (coarse sea salt would be ideal but table salt is okay too!)

Steps:

1. Preheat oven to 350

2. Mix all ingredients in a medium size bowl.

3. Scoop tablespoon size balls, roll into ball, and place on cookie sheets lined with parchment paper.

4. Use a fork to flatten the cookie, making a crosshatch pattern.

5. Bake for 8 to 10 minutes and sprinkle with salt.

Sooooo yummy!

Chewy Rippled Chocolate Chip Cookies

What You Need:

2 1/4 cup all purpose flour

1 teaspoon of salt

1 teaspoon of baking soda

3/4 cup of light brown sugar (firmly packed)

3/4 cup of granulated sugar

1 cup unsalted softened butter (2 sticks)

1 teaspoon vanilla extract

2 eggs

1 10oz bag of mini chocolate chips

Steps:

1. Blend together both sugars and softened butter. Add eggs and vanilla extract. Set aside.

2. In a separate bowl whisk together the flour, salt, and baking soda.

3. Combine the wet and dry ingredients together and add bag of mini chocolate chips.

4. Scoop tablespoon size of cookie dough onto cookie pan.

5. Bake at 375 for 8 to 10 minutes. (Oven time may vary. 8 minutes worked for mine.)

TO GET THE RIPPLES

Take the cookies out 2 to 3 minutes before they are fulling done baking. With both hands (with oven mitts on) beat the pan against the counter a few times. Don’t be too gentle, have fun with it. You will see with your eyes the ripples begin to form. Place back in oven to finish baking.

Set on cooling rack when complete.

Notes: cookie dough can be stored in fridge for 2 to 4 days. If you choose to freeze the dough I would recommend no longer than 2 to 3 months.

This cookie dough is so good!
I used a measuring tablespoon and a spoon to place the dough on the sheet.
Enjoy!